Monday, July 30, 2012

Summer Bucket List: Outdoor Scavenger Hunt

We've been slowly working our way through our summer Bucket List (which is rather long). We had a busy weekend so I was looking for something today that wouldn't be too labour intensive but would get us out of the house.

A Nature Scavenger Hunt seemed like the perfect solution!

I created a list of things to find in our immediate neighbourhood. It's best to add on things that you know you'll come across and because I was working with a toddler and a baby I made my list with items that I knew would be easy to find.

We did our scavenger hunt in three parts so it lasted the entire day.

Before we got going we made a pair of toilet paper roll binoculars, perfect for little explorers.


Midway through I realized I had "dog" on there twice. So it was swapped out for tree bark. We added on a few things as we went, too. We got stuck on finding a cat but just as we were heading out one last time we found one lying in the shade of a tree.

Overall, this was a total success. My toddler loved it so much!


And, you can place all your treasures in a mason jar or toss them back outside.


Wednesday, July 11, 2012

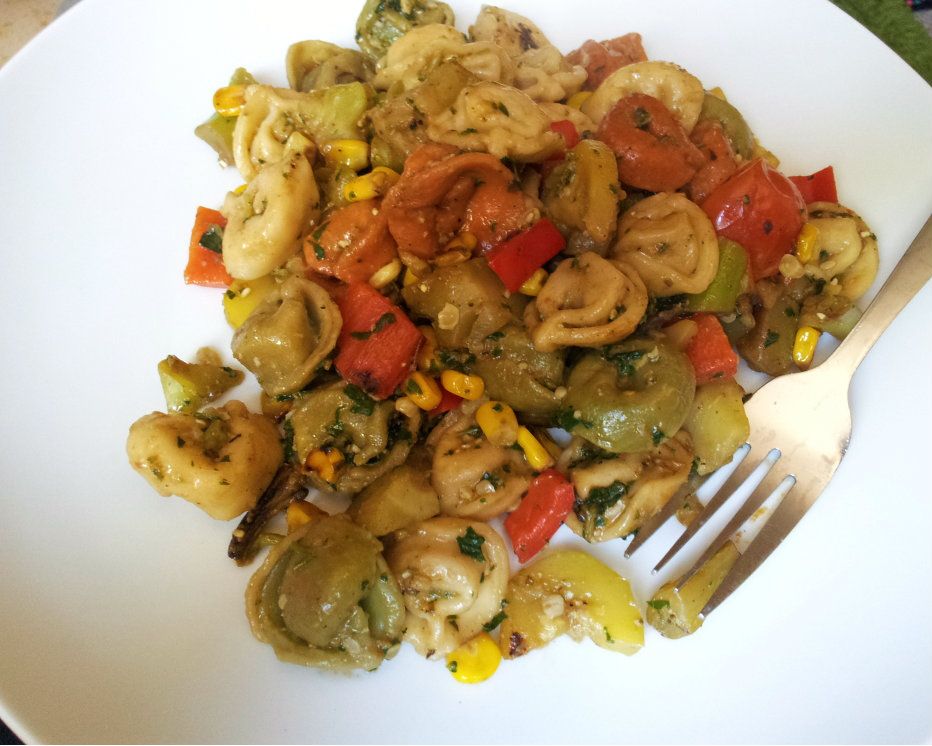
Veggie Pesto Tortellini

We spent most of the day at the park today so I wasn't in the mood to make a big dinner. I also wasn't in the mood for something that was 1) going to take a lot of time 2) going to make my kitchen hot 3) require a lot of clean up.

Pasta seemed like the perfect solution. What's even better is that my husband claims to have never tried pesto. Hard to believe, I know.

We have a massive basil plant in our backyard this year so this morning I whipped up some pesto following this recipe.

Here's the rest:

Ingredients:

1-2 packages frozen tortellini (or, make your own if you're a go-getter)
1 zucchini, peeled and cut into slices
1 red pepper, chopped
3 portobello mushrooms, sliced
1/2 bag frozen broccoli
2 cups frozen corn
handful of cherry tomatoes
zest of one lemon

How To:

Boil a pot of water and cook the pasta. Meanwhile, in a hot pan add a splash of cooking oil and toss in your peppers, cherry tomatoes, frozen broccoli, and frozen corn. Cook until veggies are soft and the tomatoes are just starting to burst. Add in lemon zest, mushrooms, and zucchini and cook until the zucchini is soft and semi-translucent.

Drain your pasta and add your veggie mix to the empty pot with 1/2 cup pesto and stir. Add in your pasta and another 1/2 of pesto and mix it all together.

And there you have it! I covered my veggies when they were cooking and that helped speed things along.


This was delicious. My husband and toddler were both fans of it, too!

Thursday, July 5, 2012

Wedding Flower Craft

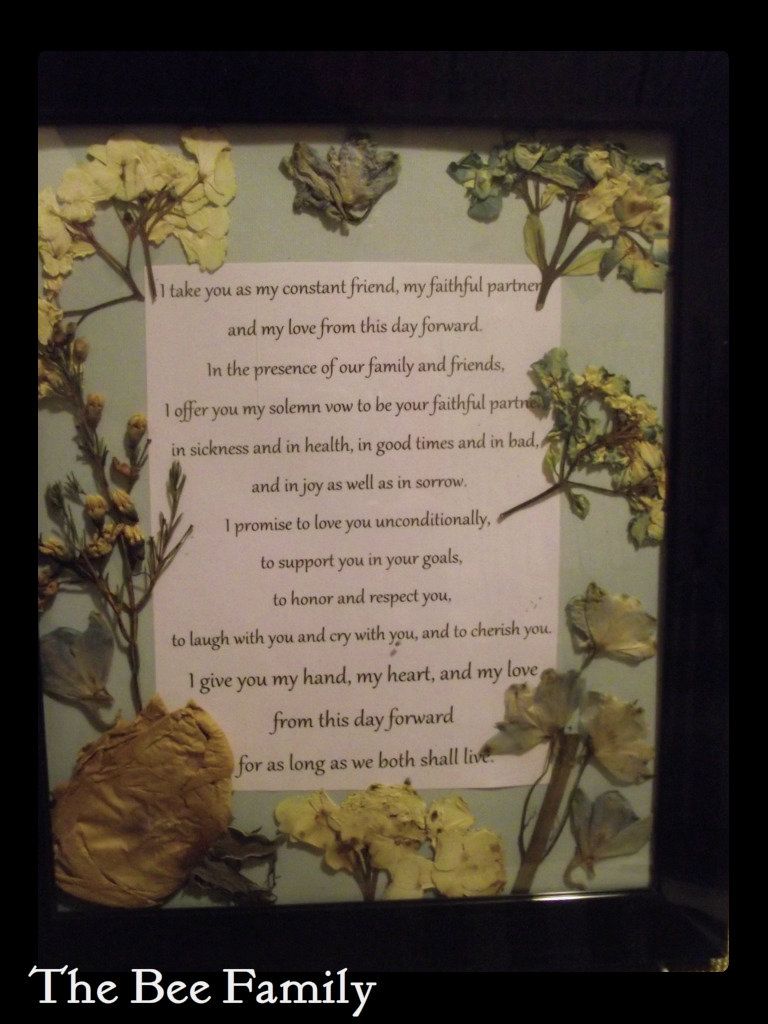
After we were married a year ago I kept most of the flowers from my bridal bouquet and pressed them between my copies of the Norton Anthology of English Literature and the Complete Works of William Shakespeare. Eventually, they were placed into a box lined with tissue paper until I knew what I wanted to do with them.

Finally, I came up with what I thought would be the perfect use for my pressed and dried flowers. You see, I'm a bit of a sentimentalist and I look for any excuse to relive our wedding day over and over....and over.

So, I came up with the idea to frame the flowers. Surprisingly, Pinterest didn't show me any similar crafts so I went it alone on this one.

So, I bought a simple black frame, cut out the correct size of acid-free scrapbook paper (in a plain pale blue) and then printed off a copy of our vows. I used glue tape (greatest crafting invention ever) to affix the vows to the centre of the frame and surrounded it with as many dried flowers as I could fit without it looking too cluttered. These I also affixed with the glue tape.

The flowers still hold hints of the colours they used to be. The dried blue hydrangeas are my favourite.

Now, I have a lovely reminder of our wedding day (other than all the photos I have) and I feel like I am getting extra use out of the flowers I spent a fortune on.

One of my favourite crafts to date, and so simple and lovely.


Tuesday, July 3, 2012

Baby Toes

This weekend we had a tea party to attend and, at the last minute, I decided I wanted to paint my daughter's toenails. But, I didn't want to use my nail polish on her teeny tiny toe nails. All those harsh chemicals and whatnot. It was too late to get some Piggy Paint and, really, I didn't want to spend the $12/bottle on such a small amount of polish. So, I improvised.

I began to wonder if using food colouring would work instead. So, I grabbed a small bowl and added some drops of food colouring and used a brush to paint Baby Bee's dainty nails. The first attempt was not a good one. She moved her foot and it stained her big toe. Thankfully, it wiped off fairly easily.

For attempt two, I added about a tablespoon of water to a bowl and one drop of food colouring. Again, I used a fine paint brush. This time it was much more successful and the "polish" dried very quickly. I still had to be careful not to get it on her skin and after three coats it was still fairly light. It has been two days since then and the colour is starting to fade. But, it was a nice alternative to the other options I had.

I've started thinking about using fruits and veggies next time. I've used beet stain for other crafts but I'm not sure how it would hold up on nails. But, with a beet stain at least I would know exactly what was in it and not have to worry about what was going on Baby Bee's precious little nails!

Look at those cute little sausage toes!!!!

Dino Fossils

We did this craft a few weeks ago but I have been seriously slacking with my blog posting and am only getting around to posting about this now. My bad.

This craft was fun to make and fun to play with. My toddler loved this one and I think this would be fun to make and use for a scavenger hunt for a birthday party.

Dinosaur Fossils (or Eggs)
Source: Here

What You Need:

11/4 cup dirt
11/4 cup flour
3/4 cup salt
1/2 cup sand
Water
Plastic dinosaurs

How To:

Mix all your dry ingredients together in a large bowl. Add small amounts of water and mix until it begins to hold together. You want it to be a dough-like texture.

Mold your "dough" around your plastic dinosaurs. Leave to dry. This can take a few hours or several days. Or, you could be a dummy like me and leave your tray outside and then have it rain....which prolonged the drying time considerably. I ended up popping these in the oven on very low heat to help speed along the drying process.

Then, let your kids go to town cracking these open.


My toddler loved this! He repeatedly shouted "WOW!" as he uncovered a dinosaur. This one was definitely a fun activity. You could put any kind of plastic toy inside these, too!

Summer!

I am usually a winter-loving kinda girl, but since I had kids I've found myself liking summer more and more. I'm still not a fan of brutal heat or humidity (I have curly hair...humidity and curly hair do not mix) but I am a fan of all the fun things you can do during the summer!

Picnics in the park, splash pads, wading pools, swimming, lemonade, going to the beach, sticky ice cream fingers, sand clinging to chubby toes, BBQs, sun kissed skin, fun nail polish colours on toes, yummy fruits, bonfires with family....The list goes on and on.

I have so many big plans for my family this summer. So many fun things I want to do with them to create the types of memories I hope they treasure when they're older.

Today, we switched out our Spring subway art for our Summer one.


The Greatest Day of my Life

Ok, well, maybe the greatest day of my life following the births of my children and when I married my husband....

For an early birthday present a few weeks ago I received this in the mail:


Right?! RIGHT?! Best. Moment. EVER!

I had no idea what was going on. My jaw literally dropped. I asked my husband if he got it for me and he had no idea where it came from.

The address on it was the one I lived in when I was 11/12. It had been forwarded to me from the Ministry of Magic Dead Letter Office. I was FREAKING OUT!


It had an actual wax seal!


Turns out, my Mom did it for my birthday. Best present ever! It's designed to look like your acceptance letter came at the appropriate age but was lost in the system and is only making it to you now. So, I WAS accepted to Hogwarts, I just got my letter several years to late. DRATS!

*To create your own letter and send it to someone (or yourself) go here: http://www.legendaryletters.com/hogwartsletter.htm

Cauliflower Pizza: FAIL!

I saw these super yummy looking cauliflower pizzas on Pinterest and thought I should try them because they look delicious.

Well, let me say...these did not work for me. At all.

I only cooked them for about half the time required and they still came out a little burnt. I tried them in paper liners and they stuck to them and would not come out. So, I tried putting them in a sprayed cupcake tin...stuck like crazy and fell apart as soon as I tried to take them out.

Despite the epic fails, they were good. I wouldn't really liken them to pizzas...they were more like a cauliflower quiche but they were still yummy.

But, I would never ever make them again. The mess would not come off my cupcake tins. I tried soaking them, filling them with water and cooking it in the oven, using a Brillo pad type thing...Nothing was getting this stuff off.

After going to the original recipe link I realized a couple things that may have sabotaged my cauliflower bites:

1. I didn't realize I was supposed to use mini cupcake tins! I didn't notice it saying that anywhere in the directions from the recipe I used.
2. You're supposed to drain the liquid from the cottage cheese. I definitely didn't do that.

So, the taste was there but it wasn't worth the hassle or the mess. These just did not work for me. Drats.


Cheap, Easy, and YUMMY!

Today has been one of those days where I've been breaking my back cleaning. I think I spent 7 hours cleaning the house and this place is sparkling.

But, after a long day of cleaning I wasn't feeling the whole spend an hour slaving over the stove thing. So, I looked into my culinary bag of tricks and pulled out this little gem.

The best things about this meal? It's cheap and it's easy. Oh, and it's DELICIOUS!

Ingredients:

Breaded chicken strips (homemade or store bought)
Pasta sauce (home made or store bought)
Cheese (we used cheddar since that's what I had on hand)
Fettuccine noodles

How To:

Cook your chicken until crispy. Boil a pot of water and cook your pasta until desired tenderness.

Once the chicken is crispy you want to pour your pasta sauce all over it. Then, top with cheese and place in the oven as high as it will go without being on broil. That way, it heats up super fast. Easy.

Once your pasta is cooked drain it, plate it, and top with your chicken/sauce/cheese mix.

And that is all! Seriously!

My toddler loved it. Ate every bite and told me it was "so nummy".